While electricity prices are rising and temperatures are falling, I decided to build a simple air quality monitor. The idea is quite simple: save money by opening windows to let fresh air in as little as possible, but prevent stagnant air by opening them as much as necessary.
What are we going to do?
Together with you, I want to build an air quality monitor to gather different parameters. To know whether I have to air my room or not I need to know the current humidity level and the carbon dioxide concentration. So my device has to be able to measure those. I want to collect, store, and visualize the gathered data centralized. In the future, I want to do this by sending all the data to my homeserver, where I can use software like InfluxDB and Grafana. Last but not least I want to get notified, whenever the humidity or the CO2 exceeds a certain threshold. This could be done by mail (using Grafana Alerts) or even better by push notification (using Home Assistant). There are a few other improvements I might implement later like a small display, a battery pack, and a 3D-printed case to bring it all together.
About the Raspberry Pi Pico
The Raspberry Pi Pico is a low-cost, high-performance microcontroller board. There are two different versions: the normal Pico and the Pico W, which come with built-in WLAN. It comes with a rich peripheral set, including SPI, I2C, and eight Programmable I/O (PIO) state machines for custom peripheral support. You can use C or MicroPython (an implementation of Python 3) to program it. All this makes it the perfect match for all kinds of small hobby projects like this.
About the sensors
I am using two sensors to gather all the data I need. The DHT22 measures temperature and humidity. The CCS811 detects Volatile Organic Compounds (VOCs). We can use this to get a Total Volatile Organic Compound (TVOC) reading and an equivalent carbon dioxide reading (eCO2).
Wiring it all up
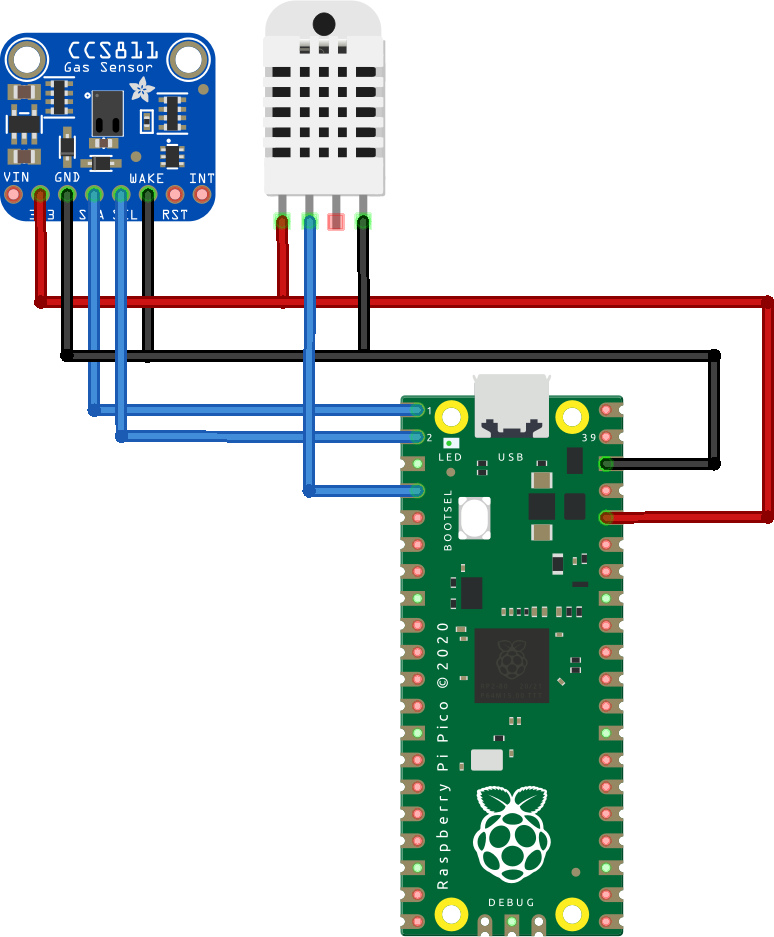
The wiring is quite simple. Check out the Picos pinout diagram and then connect the sensors according to their documentation.
CCS811:
-
3V3 to 3V3 (red)
-
GND to GND (black)
-
I2C (blue) — SDA to GP0 (SDA) & SCL to GP1 (SCL)
-
WAKE to GND (black)
DHT22
-
VCC to 3V3 (red)
-
Data to GP2 (blue)
-
GND to GND (black)
The dependencies
First, you will have to download CircuitPython. CircuitPython is a programming language based on MicroPython. You also should set up your development environment and get a code editor for Python (if you don’t have one). A quick and easy way is using Mu, a simple editor that works out-of-the-box with CircuitPython. It comes for Windows, Linux, and Mac and can easily be connected with most microcontrollers. You can find some detailed instructions here. There are also solutions for IDEs like PyCharm.
Now you can install CircuitPython onto your board. Therefore you have to unplug the Pico. Then hold down the BOOTSEL button on your Pico. Plug the Pico into your computer’s USB port while still holding down the BOOTSEL button. Now let go of the BOOTSEL button. Now you should be able to see the RPI-RP2 drive. Open it and copy the adafruit_circuitpython_etc.uf2 into it. RPI-RP2 disappears and the CIRCUITPY drive appears. You have successfully installed CircuitPython.
Next, you will have to copy all the dependencies. Simply download the Adafruit CircuitPython Bundle. In it, you will find everything you need. Copy the following modules from the bundle’s lib folder into the lib folder on your CIRCUITPY drive:
-
adafruit_ccs811.mpy -
adafruit_register/* -
adafruit_bus_device/* -
adafruit_dht.mpy
The code
import time
import board
import busio

import adafruit_ccs811
import adafruit_dht


# DHT setup
dht = adafruit_dht.DHT22(board.GP2)

# I2C setup
i2c = busio.I2C(scl=board.GP1, sda=board.GP0)
ccs811 = adafruit_ccs811.CCS811(i2c)

# Wait for the sensor to be ready
while not ccs811.data_ready:
    pass

while True:
    try:
        print("CO2: {} PPM\tTVOC: {} PPM".format(ccs811.eco2, ccs811.tvoc))
        print("Temp: {:.1f} *C\tHumidity: {}%".format(dht.temperature, dht.humidity))
    except Exception as e:
        print("Error: ", e.args)

    print()
    time.sleep(1)
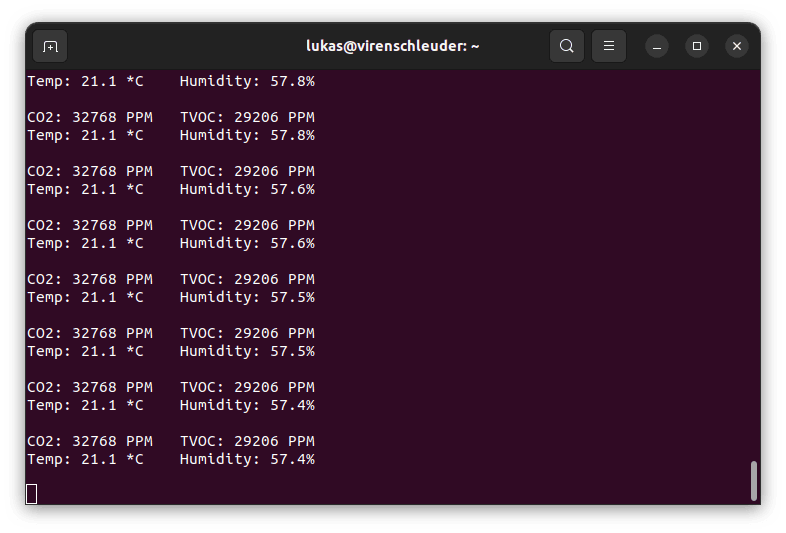
This code (always get the latest version on GitHub) will read all the sensors and print their readings to the console:
Create a new file called code.py (you must name it like this, otherwise CircuitPython won’t find it) and copy the code into it. As soon as you save the file the code will be executed.
To check the outputs use Mu to open a serial connection. If you are on Linux you can also use minicom (sudo minicom -o -D /dev/ttyACM0).
The output
Now you should see something like this:
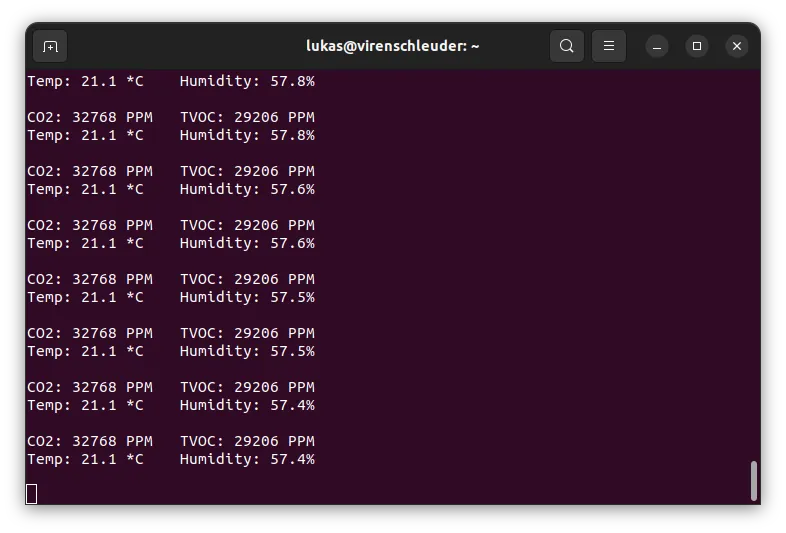
You can check if your sensors are working by simply blowing on them. This should raise the CO2 and TVOC readings.
What’s next?
Now that we can read data from sensors, we need a way to connect the Pico to the WiFi and upload this data somehow, so that we can easily access it. So in the next part, we will use MQTT to upload our data to Adafruit IO. There we will be able to build a simple dashboard and also set up alerts.
If you’d like to see this, stay tuned for the next part.