Introduction
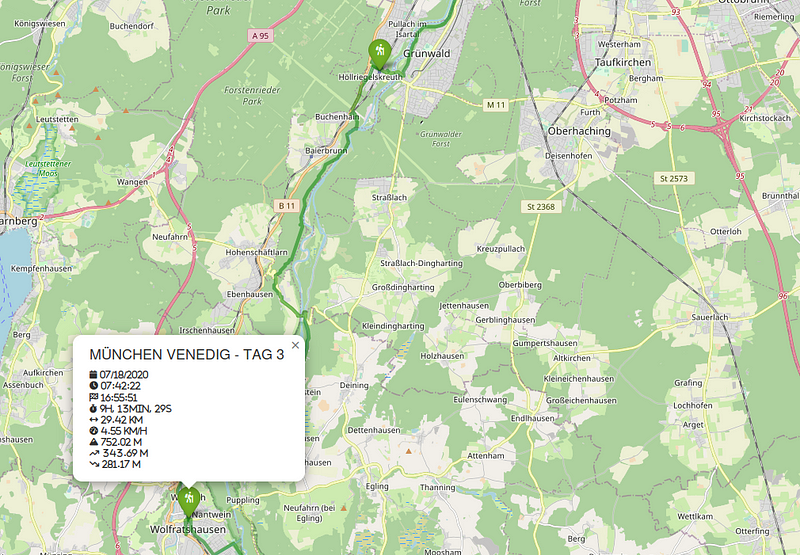
In my last story, I showed you how you can use Python and Folium to create an interactive app to showcase all your outdoor activities:
https://krimphove.site/blog/visualizing-outdoor-activities-with-python-folium
Now you've created a captivating map that brings your outdoor activities to life. You can use those maps to visually retrace your journeys, celebrate your progress, and relive those adventures.

But what good is it if only you can see it?
Are you ready to showcase your adventures to the world? In this next story, I'll walk you through the process of deploying your interactive map to AWS using Terraform. This tool is great for managing infrastructure as code, and we'll go through the necessary steps to provision and configure the resources needed for your map to be accessible to anyone with an internet connection. By utilizing S3 buckets, Lambda functions, and CloudFront, we'll create a solution that is simple to deploy and maintain.
So get ready to share your outdoor accomplishments with loved ones and fellow outdoor enthusiasts all across the globe!
The Solution

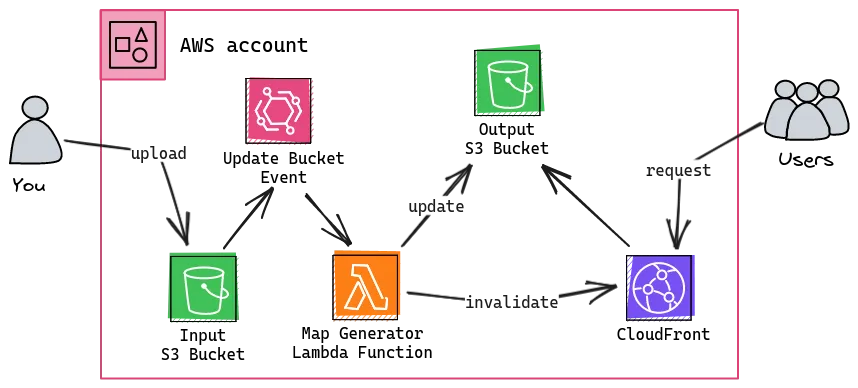
As you can see our solution consists of multiple elements:
-
At its core, we have two S3 buckets, one for input and another for output. The input bucket becomes the repository for your GPX files, where you'll store the raw material of your outdoor activities. Whenever a new GPX file is uploaded, an EventBridge event is triggered, signaling the arrival of fresh data.
-
This is where the Lambda function steps onto the stage. It takes the newly arrived GPX file, parses it to extract the essential trail data, and plots the trails on the map. The Lambda function then creates the HTML of the map and places it into the output bucket, ready to be shared with the world.
-
To guarantee swift and seamless access to the map, we use CloudFront. This service acts as a content distribution network that caches and delivers the output buckets content to users globally from edge locations. It reduces latency and improves performance.
What is Terraform?
Terraform is an open-source infrastructure-as-code software tool created by HashiCorp. It allows you to define and manage your infrastructure as code, making it easy to provision and manage resources across multiple cloud providers. With Terraform, you can ensure consistent and repeatable deployments, making it an ideal choice for automating your cloud infrastructure.
Setting Up the Environment
Before we begin, ensure you have Terraform installed on your local machine. You can download it from the official website and follow the installation instructions.
You will also have to install the AWS CLI and have to configure it so that you can deploy to your AWS account. I wrote a story on using the Windows Subsystem on this.
Once you have Terraform installed, create a new directory for your project and place the main.tf file provided above in this directory. This file contains the Terraform configuration that describes the resources we need to deploy the map.
Provisioning AWS Resources
Our map requires several AWS resources to be provisioned, such as S3 buckets for storing the website files, an AWS Lambda function to generate the map, and a CloudFront distribution to serve the map securely and efficiently.
Buckets
We'll use S3 buckets to store the website files and the map generated by the Lambda function. The provided Terraform code uses the terraform-aws-modules/s3-bucket module to create the buckets.
data "http" "mime_types" {
  url = "https://gist.githubusercontent.com/lkrimphove/46988dc2ac63ad5ad9c95e6109e3c37e/raw/2349abeb136f1f8dbe91c661c928a5ce859432f9/mime.json"
  request_headers = {
    Accept = "application/json"
  }
}

locals {
  mime_types = jsondecode(data.http.mime_types.response_body)
}


### BUCKETS

module "input_bucket" {
  source = "terraform-aws-modules/s3-bucket/aws"

  bucket = var.input_bucket
  acl    = "private"

  control_object_ownership = true
  object_ownership         = "ObjectWriter"

}

module "output_bucket" {
  source = "terraform-aws-modules/s3-bucket/aws"

  bucket = var.output_bucket
  acl    = "private"

  control_object_ownership = true
  object_ownership         = "ObjectWriter"
}

resource "aws_s3_object" "object" {
  for_each     = fileset("../src/website", "*")
  bucket       = module.output_bucket.s3_bucket_id
  key          = each.value
  acl          = "private"
  source       = "../src/website/${each.value}"
  content_type = lookup(local.mime_types, split(".", each.value)[1], null)
  etag         = filemd5("../src/website/${each.value}")
}
Lambda Function
The Lambda function is the heart of our map generation process. It takes the GPX data from the S3 bucket, processes it, and generates an interactive map. We'll use the terraform-aws-modules/lambda module to create and manage the Lambda function.
### LAMBDA

module "lambda_function" {
  source = "terraform-aws-modules/lambda/aws"

  function_name = "outdoor-activities-generator"
  description   = "Generates a map containing your outdoor activities"
  handler       = "main.lambda_handler"
  runtime       = "python3.11"
  timeout       = 60

  source_path = "../src/lambda"

  environment_variables = {
    START_LATITUDE             = var.start_latitude
    START_LONGITUDE            = var.start_longitude
    ZOOM_START                 = var.zoom_start
    INPUT_BUCKET               = module.input_bucket.s3_bucket_id
    OUTPUT_BUCKET              = module.output_bucket.s3_bucket_id
    S3_OBJECT_NAME             = "map.html"
    CLOUDFRONT_DISTRIBUTION_ID = module.cloudfront.cloudfront_distribution_id
  }

  layers = [
    module.lambda_layer.lambda_layer_arn,
  ]

  attach_policy = true
  policy        = aws_iam_policy.lambda_policy.arn
}

module "lambda_layer" {
  source = "terraform-aws-modules/lambda/aws"

  create_function = false
  create_layer    = true

  layer_name          = "outdoor-activities-layer"
  description         = "Lambda layer containing everything for Outdoor Activities"
  compatible_runtimes = ["python3.11"]
  runtime             = "python3.11"

  source_path = [
    {
      path             = "../src/lambda-layer"
      pip_requirements = true
      prefix_in_zip    = "python" # required to get the path correct
    }
  ]
}

resource "aws_iam_policy" "lambda_policy" {
  name = "outdoor-activities-generator-policy"

  policy = jsonencode({
    Version = "2012-10-17"
    Statement = [
      {
        Action   = "s3:GetObject"
        Effect   = "Allow"
        Resource = "${module.input_bucket.s3_bucket_arn}/*"
      },
      {
        Action   = "s3:ListBucket"
        Effect   = "Allow"
        Resource = module.input_bucket.s3_bucket_arn
      },
      {
        Action   = "s3:PutObject"
        Effect   = "Allow"
        Resource = "${module.output_bucket.s3_bucket_arn}/*"
      },
      {
        Action   = "cloudfront:GetDistribution"
        Effect   = "Allow"
        Resource = module.cloudfront.cloudfront_distribution_arn
      },
      {
        Action   = "cloudfront:CreateInvalidation"
        Effect   = "Allow"
        Resource = module.cloudfront.cloudfront_distribution_arn
      }
    ]
  })
}

resource "aws_lambda_permission" "allow_bucket" {
  statement_id  = "AllowExecutionFromS3Bucket"
  action        = "lambda:InvokeFunction"
  function_name = module.lambda_function.lambda_function_arn
  principal     = "s3.amazonaws.com"
  source_arn    = module.input_bucket.s3_bucket_arn
}

resource "aws_s3_bucket_notification" "bucket_notification" {
  bucket = module.input_bucket.s3_bucket_id

  lambda_function {
    lambda_function_arn = module.lambda_function.lambda_function_arn
    events              = ["s3:ObjectCreated:*"]
  }

  depends_on = [aws_lambda_permission.allow_bucket]
}
CloudFront Distribution
To serve the map with low latency and high performance, we'll use CloudFront, AWS's content delivery network (CDN). CloudFront caches the map in edge locations worldwide, reducing the load on the origin server (our S3 bucket). We'll use the terraform-aws-modules/cloudfront module to create the CloudFront distribution.
### CLOUDFRONT

module "cloudfront" {
  source              = "terraform-aws-modules/cloudfront/aws"
  comment             = "Outdoor Activities Cloudfront"
  is_ipv6_enabled     = true
  price_class         = "PriceClass_100"
  wait_for_deployment = false

  create_origin_access_identity = true
  origin_access_identities = {
    s3_bucket = "s3_bucket_access"
  }

  origin = {
    s3_bucket = {
      domain_name = module.output_bucket.s3_bucket_bucket_regional_domain_name
      s3_origin_config = {
        origin_access_identity = "s3_bucket"
      }
    }
  }

  default_cache_behavior = {
    target_origin_id       = "s3_bucket"
    viewer_protocol_policy = "redirect-to-https"

    default_ttl = 5400
    min_ttl     = 3600
    max_ttl     = 7200

    allowed_methods = ["GET", "HEAD"]
    cached_methods  = ["GET", "HEAD"]
    compress        = true
    query_string    = false

    function_association = {
      viewer-request = {
        function_arn = aws_cloudfront_function.viewer_request.arn
      }
    }
  }

  default_root_object = "index.html"

  custom_error_response = [
    {
      error_code         = 403
      response_code      = 404
      response_page_path = "/404.html"
    },
    {
      error_code         = 404
      response_code      = 404
      response_page_path = "/404.html"
    }
  ]
}

data "aws_iam_policy_document" "s3_policy" {
  version = "2012-10-17"
  statement {
    actions   = ["s3:GetObject"]
    resources = ["${module.output_bucket.s3_bucket_arn}/*"]
    principals {
      type        = "AWS"
      identifiers = module.cloudfront.cloudfront_origin_access_identity_iam_arns
    }
  }
}

resource "aws_s3_bucket_policy" "docs" {
  bucket = module.output_bucket.s3_bucket_id
  policy = data.aws_iam_policy_document.s3_policy.json
}

resource "aws_cloudfront_function" "viewer_request" {
  name    = "cloudfront-viewer-request"
  runtime = "cloudfront-js-1.0"
  publish = true
  code    = file("../src/viewer-request.js")
}
Deploying Your Map
Create a deploy.tfvars.json file and change the values to fit your map (you have to change the bucket names, as those have to be globally unique):
{
  "input_bucket": "outdoor-activities-input",
  "output_bucket": "outdoor-activities-output",
  "start_latitude": "48.13743",
  "start_longitude": "11.57549",
  "zoom_start": "10"
}
Create a output.tf file (this will print out information to the console):
output "cloudfront_distribution_domain_name" {
  value = module.cloudfront.cloudfront_distribution_domain_name
}
Once you've set up the Terraform environment and configured the main.tf and deploy.tfvar.json files, run the following commands in your terminal:
-
Initialize Terraform:
terraform init -
Plan the deployment to see what resources will be created:
terraform plan -var-file=„deploy.tfvars.json“ -
Apply the changes to provision the resources:
terraform apply -var-file=„deploy.tfvars.json“
Terraform will show you a summary of the changes that will be made. If everything looks good, type yes to apply the changes. Terraform will now create all the necessary AWS resources for your map. You will find your URL in the console.
Now you are ready to upload your GPX files to the input bucket. Make sure to keep this file structure:
input-bucket
├── Hiking
│   ├── Trail Group 1
│   │   ├── Activity_1.gpx
│   │   ├── Activity_2.gpx
│   │   └── ...
│   └── Trail Group 2
│       ├── Activity_1.gpx
│       ├── Activity_2.gpx
│       └── ...
├── ...
└── Skiing
    ├── Trail Group 1
    │   ├── Activity_12.gpx
    │   ├── Activity_13.gpx
    │   └── ...
    └── Trail Group 3
        ├── Activity_14.gpx
        ├── Activity_15.gpx
        └── ...
Conclusion
Congratulations! You've successfully deployed your interactive map of outdoor activities using Terraform and AWS. Your map is now accessible to the world, allowing others to explore your exciting adventures and celebrate your progress.
With Terraform's infrastructure-as-code approach, you can easily manage and update your map in the future. You can add new activities by simple uploading new gpx files to the input bucket. If you want to modify the map's appearance, or enhance it with additional features, you can do all this with just a few changes to the Terraform configuration.
So go ahead, share your map with friends, family, and fellow outdoor enthusiasts.
Happy mapping!
What's Next?
You've learned the basics of deploying your map with Terraform. But there's so much more you can do to enhance your map and create an even richer experience for your audience:
-
Add your own domain to your CloudFront distribution for easier access.
-
Don't want to share your map with everybody? Control access to your map by adding authentication and authorization features with AWS Cognito.
-
Set up a continuous deployment pipeline to automatically update your map whenever you push code changes to your git-repo.
The possibilities are endless. Have fun exploring and expanding your outdoor activities map!
References
-
You can find all the code on my GitHub
